

Coleus – Summer Jewels in the Garden
During the summers with the temperature going up to 40 degree C and water shortage, Coleus with its multi colour and beautiful leaves, can make your garden graceful and charming.
During the summers with the temperature going up to 40 degree C and water shortage, Coleus with its multi colour and beautiful leaves, can make your garden graceful and charming.
Though Coleus is as old as gardening goes, this plant has re-appeared in most gardens once again and is just as beautiful now as it were then, maybe a bit more. They came in many colors; mostly greens, reds, and some yellows. Most have a border around the edges with dark colors filling in the centers. They can be rightly called the “Jewels of the Garden” because of their emerald greens, garnet and ruby reds colours.
Coleus is natives of Indonesia and Africa. Coleus are annuals (some are biennials) and do not tolerate cold temperatures at all. Some varieties put out a spike of flowers in late summer that can range from white to pink and purple. The coleus plants are not grown for the flowers. The flowers should be snipped off so that the energy of the plant goes back into the gem tinted foliage. When you pinch the flower stalks or any of the leaves make sure to pinch them up instead of down. If you pinch down it is possible that you remove a little more of the stem skin than desired making and the plant may be damaged.
Coleus is very easy to grow; in fact, there are over 500 varieties in cultivation today. It is interesting to note that the plant used to be called Coleus blumei, now it is called Solenostemon scutellarioides.
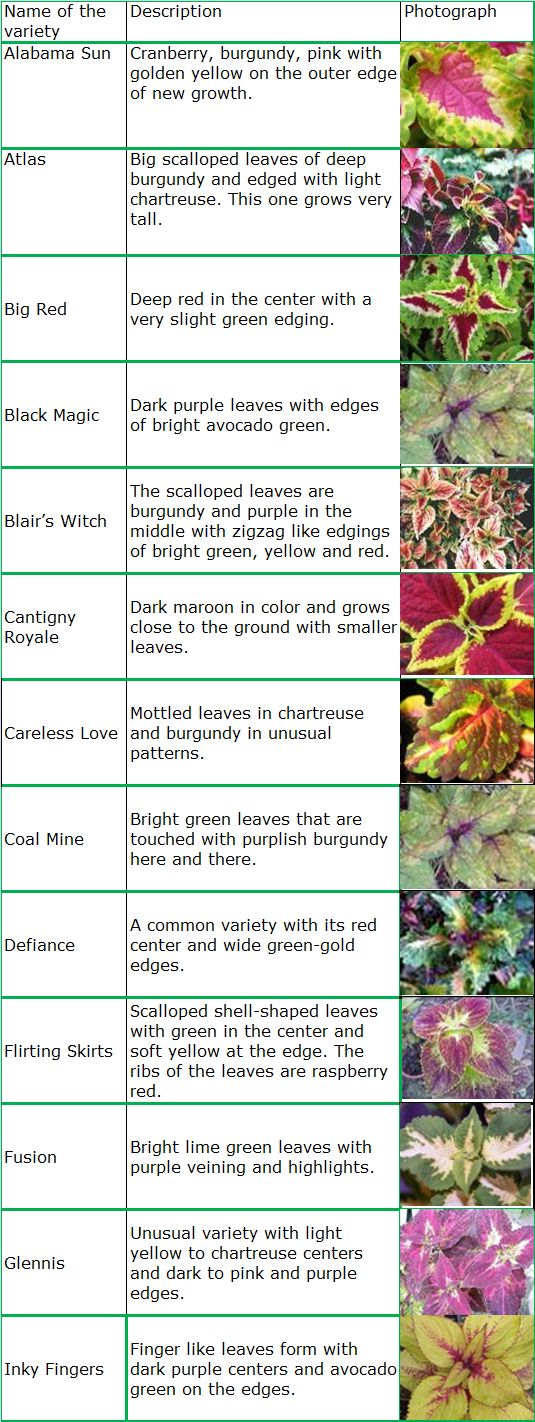
Coleus is grows best in daytime temperatures of 25 to 30 degrees C and night temperatures over 15 degrees C. They prefer well-drained, moist soil with an application of fertiliser once a month. If you are located in colder climates, you can winter-over coleus by placing them in a sunny window or under grow lights; however, in most cases they will start to wilt. Take a good cutting (or two, or three) and stick it in water until it roots. After rooting, plant in soil and keep on the window sill until summer when you can plant them in a pot or in a garden. They grow quite fast, and as such you may have to take cuttings from your cuttings two or three times during the winter. Today we have the common varieties, the hybrids and the named varieties. Some of the named varieties are given at the bottom of this page:
Besides these, hundreds of more beautiful coleus is available for planting in your garden. Whether you plant one variety or many, coleus will make you proud of your garden. Coleus -What is it?
Botanical and Common Name - The scientific name of coleus is Coleus hybridus and the plant is usually called by the name "Coleus", but other common names include Flame Nettle and Painted Nettle
Plant Category - Coleus plants are frost tender perennials that are usually grown as annuals.
Bloom Time and Color - Coleus is grown for the colorful and variegated foliage although it does produce light blue flower spikes.
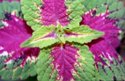
Foliage - The leaves of the coleus plant are highly decorative, often textured or with interesting shape, the colors are especially bright. Reds, pinks, greens and purples are often seen with heavy variegation.
Growth Habit - Coleus is a generally upright growing plant that creates colorful accents in container plantings.
Size - Coleus can reach between one and three feet tall with a spread of eight to twelve inches.
Maintenance - Coleus needs little maintenance beyond regular watering.
Pests or Diseases - Few pests or diseases disturb coleus, making it ideal for container plantings where overcrowding can cause problems for more disease-prone plants.
Propagation Methods - While most gardeners purchase coleus from garden centers and nurseries as already started plants, it is easy to grow from cuttings. Starting coleus from seeds can be slightly more difficult but many gardeners have had success doing so when starting indoors eight to ten weeks before the commencement of spring.
Using Coleus in the Garden
Soil Conditions - Coleus prefers rich, evenly moist soil and will grow in part to full shade.
Companion Plants - Grow coleus with other foliage plants such as hosta, ferns or bergenia. Use colorful shade container plants to create interesting focal points, by pairing coleus with purple fountain grass, verbena, and impatiens.
Seasons - As an annual plant, coleus does not overwinter in the garden.
Uses in the Garden - Use coleus anywhere bright color is needed in full or part shade. Anecdotally, the coleus with darker colored leaves will tolerate brighter sun than the varieties with lighter foliage. Many gardeners use coleus in containers, as edging plants, near ponds or water accents, along walkways, hanging baskets, porch rail planters and in small garden spaces. With so many fantastic garden uses, it's no wonder that coleus is a staple for many landscapes and containers.
Planting
Sow coleus seeds in well-drained soil and keep them moist until sprouted. Once spouted, coleus leaves begin to show color in two weeks. They grow into a bushy leaf plant with leaves in green, yellow, maroon, and other colors. Coleus grows easily from cuttings. A cutting stuck into a glass of water or damp lightweight potting soil will root in 2 to 4 weeks. When new leaves show, it can be planted in a larger pot or the gaeden. Garden center bedding plants offer the showiest display of foliage in a short time. These plants are ready for direct garden or indoor planting.
Landscape Uses
Coleus grows under many conditions. The plants grow best in warm climates and partial shade. The showy foliage is excellent for bare areas around annuals and flowering shrubs. Coleus in moist, well-drained and rich soil will grow as wide as it is tall. The colorful leaves provide contrast to ferns and other dense green foliage. Coleus offers bright coloring to shade spots under trees and along house foundations. It also partners well in gardens, borders or planters with flowering plants such as petunias, verbena and begonias.
Indoor Uses
Coleus grows indoors as long as the plant has well-drained soil and receives sunlight. The smaller coleus plants are low maintenance, requiring only occasional fertilizer, water and pruning. They are popular for in terrariums, snifter and other glass container gardens. Trailing coleus grows well in sunroom hanging baskets. Upright coleus can be pruned and trained as a small tree shaped ornamental.
Problems
Coleus needs fertilizer high in nitrogen to produce thick, color-rich growth. The roots should dry out between watering or the plants become infected with fungus disease. Root rot leads to death of the leaves and plant. Coleus is vulnerable to some pests such as whiteflies, mites and aphids. The aphids also spread fungus that looks like black soot. These pests are controlled with organic and chemical insecticides. Slugs and snails enjoy the shade of the coleus and will quickly infest the plant unless controlled. New coleus hybrids are more disease and insect resistant than traditional plants.
How to take cuttings
Things you will need: Sharp knife or a razor blade, Perlite, Potting mix, Plastic planting tray, Chopsticks, Plastic bag, Four inch pots
1. Select a healthy, non-flowering stem that is about 4 inches long and has at least three leaf nodes-the swollen spot where the leaf adjoins the stem. Use a knife to remove the stem. Make the cut right below a node. Remove any leaves from the bottom inch of the cutting.
2. Cuttings grow best in light, fluffy soil. To make a nice, lightweight growing medium, mix together perlite and soilless potting mix in a 1:1 ratio. Pre-moisten this soil by adding water until the mix is damp, but not soggy. Fill a plastic planting tray (they are available at nurseries) with the mix, leaving at least a ½ inch of space between the top of the soil and the rim of the tray.
3. In the tray, space the cuttings about 4 inches apart in two rows. To plant, make a hole that is 1 inch deep. Pick up a single cutting by its leaves and stick it into the hole, making sure that no leaves will be buried in the soil. Gently press the potting medium around the stem. Repeat this step until all cuttings are planted.
4. Place a label in the tray that includes the name
(s) of each coleus variety and the date the cuttings
were planted. Place a disposable bamboo chop stick
in each corner of the pot and slide a plastic bag over
the sticks, tucking the edges of the bag under the
tray. This helps keep the humidity high around the
cuttings and prevents them from wilting.
5. Place the tray in a bright south or west facing window. To speed up rooting you can place the tray on a special seeding heat mat (these are available at nurseries). The mat warms the soil from the bottom. If you don't want to invest in a mat, no worries, the seedlings will grow roots without it.
6. Check the moisture of the soil in the tray daily and make sure that it stays evenly moist, but not soggy, which could cause the cuttings to rot. Roots should develop within two to four weeks. To find out if your cutting has rooted, give it a gentle tug. If you feel a bit of resistance, roots have probably started to grow.
7. When your cuttings each have two new sets of
leaves you can transplant them into individual four-
inch plastic pots. Fill the pots with potting soil and
water the soil in. Using a chopstick, make a hole in
the center of the pot. Pick up the cutting by its
leaves and stick it into the hole. Gently press the
potting medium around the stem and then water the
cutting in. Keep the pots in a bright, sunny window.
When the cuttings have grown three new sets of
leaves, you can transplant them outside or into
larger pots.
Seed Collecting Things you will need: Clean glass bowl, Full-sized sheet of newspaper, Clean, empty pepper shaker, Envelope, Pencil or pen
1. Carefully cut the dried, brown flower spikes from the coleus and move them carefully into the glass bowl, taking care to avoid shaking them or breaking the delicate seed pods on the spikes.
2. Spread the newspaper sheet across a table or other flat surface. Pick up a flower spike by the stem, and hold it upside down, over the center of the newspaper. Starting at the base of the spike, strip the seed pods from the stem using your thumb and forefinger. Repeat with all the spikes.
3. Mash all the pods on the newspaper using your fingers, or squeeze the pods until they break open. Make sure you work over the newspaper so that it will catch all the tiny seeds.
4. Pick up each side of the newspaper, causing the dried pod husks, seeds and all other material stripped from the coleus flower stems to slide into the center fold of the newspaper page. Join the two edges and fold them over at the top.
5. Pour all the coleus seeds, husks and other dried material from the newspaper into the pepper shaker. The newspaper fold will serve as a guide to direct the material into the shaker with minimal spilling.
6. Put the lid back on the pepper shaker.
7. Label the envelope using a pen or pencil.
8. Shake the seeds from the pepper shaker into the envelope. The shaker head will sort out the seed pods and most of the dried material, allowing only the seeds to shake into the envelope. Seal the envelope and store it in a cool dry place.
Germinating Coleus Seeds
Things you will need: Coleus seeds, Seed-starter mix, Seed starting tray, Irrigation tray, Clear plastic wrap, sheet of glass or plastic, a Spoon 1. Put seed-starter mix into a seed-starting tray until it is about three quarters full. Pack down the soil in the tray until it is well-firmed. If necessary add, or remove, soil from the tray to make sure the soil is within 1/2 inch from the rim.
2. Set the seed-starting tray into an irrigation tray or similar container. Pour water into the irrigation tray one inch at a time until the growing medium in the seed-starting tray is well-saturated. Then pour out the remainder of the water from the irrigation tray.3. 3. Sprinkle the Coleus seeds across the surface of the soil in the seed-starting tray. Coleus seeds are tiny--you might want to use tweezers to pick up the seeds. Try to space the Coleus seeds about 1/2 inches apart. Use the back of a spoon to push the seeds into the soil. Do not place any soil over the seeds; Coleus seeds need light in order to germinate.
4. Place a sheet of glass, clear plastic or plastic wrap over the seed-starting tray. If using plastic wrap, make sure it does not come in contact with the growing medium.
5. Put the seed-starting tray into a warm and light-filled location. The temperature needs to be about 70 degrees F. There should be at least 8 to 10 hours of light available, but do not place the tray where it will receive direct sunlight.
6. Keep the soil in the seed-starting tray moist. Add water to the watering tray when necessary.
7. Remove the plastic wrap, sheet of glass or plastic sheet from the seed-starting tray once the Coleus plants emerge. Germination of Coleus seeds can vary from 10 to 15 days.
8. Transplant your Coleus seedlings when they have a set of leaves. You can put them into 4-inch pots or into planting cells.A ll photos by Aupoet It is easy to root coleus plants by taking cuttings and growing them as potted plants over the winter. This is a nice way to have fresh new plants for setting out in the garden in the spring. With a greenhouse or even just a sunny, warm, window sill, it is simple to root coleus and keep them alive and health
9. It is easy to root coleus plants by taking cuttings and growing them as potted plants over the winter. This is a nice way to have fresh new plants for setting out in the garden in the spring. With a greenhouse or even just a sunny, warm, window sill, it is simple to root coleus and keep them alive and healthy.