Garlic Growing for The Beginners
Garlic is for Heroes-They say that shallots are for babies and onions are for men—while garlic is for heroes. Let garlic be the hero of your organic garden this year. Growing garlic is a great way to keep your garden productive all winter long. Now is the time to plant your cloves for a bountiful harvest next year.
Whether you like garlic in spaghetti sauce or stir-fry, or just around the rose bushes to ward off pests, fall is the time to plant it for harvest the following summer. If you've never grown your own garlic before, never fear because it's easy and problem-free. Here's how to get started on a great crop of garlic.
Know your garlic types:
Garlic is truly an international food, lending its flavor to a buffet of dishes from Szechuan stir-fries to Moroccan tanginess, Argentinean chimichurri sauces, Italian pasta dishes, and more. The bulb owes its popularity to both its culinary uses and its health benefits—consuming garlic has been linked to reduced cancer risk and better cardiovascular health. Like so many foods, the garlic commonly found in the market is sold not for its fine flavor but for its superior storage time. Growing garlic opens the door to a range of tempting possibilities, from bulbs wrapped in luminous pink-streaked wrappers (as the papery outer skins are known) to ones composed of mild, almost sweetly flavored cloves. Best of all, garlic is one of the easiest vegetables to grow. All one needs is a small measure of patience, waiting for the autumn-planted crop to ripen for a summer harvest.
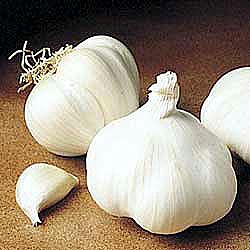
A member of the genus Alliums, which includes onions, shallots, leeks, and chives, as well as ornamental onions, garlic is an underground bulb (also called a head) made up of individual cloves; when you plant a clove, it matures into a bulb. Garlic is divided into two categories, hardneck and softneck, that differ in the size of the bulb, the number and size of cloves, color, hardiness, and storage qualities. Elephant garlic, which is the sort most often used for roasting, is actually a type of leek that has a mild garlic flavor. Hardneck Garlic sold in grocery stores is often imported from China and treated with a chemical to prevent sprouting, so be sure to buy untreated heads, usually from a local farmers' market or from a nursery Plant in full and sun and deep, rich soil: Soil preparation:
Garlic will tolerate some shade but prefers full sun. While I've seen cloves sprout in gravel pits, garlic responds best in well-drained, rich, loamy soil amended with lots of organic matter. Raised beds are ideal, except in very dry regions.
To grow garlic, you plant the cloves, the sections of the bulb; each clove will produce a new bulb. The largest cloves generally yield the biggest bulbs. To get the cloves off to a strong start and protect them from fungal diseases, soak them in a jar of water containing one heaping tablespoon of baking soda and a tablespoon of liquid seaweed for a few hours before planting To prepare garlic for planting, split the bulb into cloves, leaving their papery coverings intact. Choose only those that are firm and free of brown spots and damage." The secret with garlic is to plant the biggest cloves, for the simple reason that big cloves develop into large heads of garlic. Plant each clove with the pointed growing tip up and the flat root end down. In areas with mild winters, set the cloves about 1 to 2 inches deep. Where winters are severe, plant the cloves 2 to 4 inches deep. Space them 4 to 6 inches apart in the row with 12 inches between rows. Spread a 2-to-3-inch layer of straw over the planting area to help keep the soil moist and winter weeds in check. Keep the cloves watered for about 3 weeks after planting to aid root growth. Spacing:
Place cloves in a hole or furrow with the flat or root end down and pointed end up, with each tip 2 inches beneath the soil. Set the cloves about 6 to 8 inches apart. Top the soil with 6 inches of mulch, such as straw or dried grass clippings mixed with leaves. You'll see shoots start growing right through the mulch in four to eight weeks, depending on your weather and the variety you've planted. They stop growing during winter, then start again in spring. Leave the mulch in place into spring; it conserves moisture and suppresses weeds (garlic competes poorly with weeds).
Care and Feeding:
Fall planting—September or October—allows garlic cloves to develop a robust root system, though gardeners in southern states may have better results planting in late winter for summer harvest. After planting, a few leaves may sprout from the clove, but they stop growing when cold weather arrives. Watering:
Garlic needs about an inch of water each week during spring growth. If you have to augment rainfall with the garden hose, stop watering by June 1 or when the leaves begin to yellow in order to let the bulbs firm up.
Scape Sacrifice: By mid-June, your garlic will begin sprouting flowery tops that curl as they mature and ultimately straighten out into long spiky tendrils. These savory stalks, known as scapes, should be removed to encourage larger, more efficient bulb growth. Fertilizing: Start foliar-feeding your garlic every two weeks as soon as leaf growth begins in spring (typically in March) and continue until around May 15, at which point the bulbs begin to form. Cut off the hardneck flower scapes when the looping stems begin to straighten; use raw or stir-fried. Harvesting a leaf or two from each plant to use in place of chives is fine, but don't cut too many, because they supply energy to the growing bulbs. Bulbs are ready to harvest when about half the leaves turn yellow and fall over or when only three or four green leaves remain on the plant. Avoid damaging the bulbs by using a garden fork to lift them rather than pulling them out. Braiding Garlic: Softnecks are easiest to braid, but hardnecks may also be used if harvested a few days early, cured for a couple of days to allow the stems and leaves to dry out a little (to prevent molding), and then bent at the necks (between your thumb and forefinger). Softnecks should also be cured for a few days before braiding, but don’t let them stiffen up. Medium-size heads work best. Try this recipe:
Roasted Garlic
Ingredients
.
Hardneck garlic (Alliums sativum ssp. ophioscorodon) produces a stiff flowering stalk, called a scape, topped with bulbils (tiny bulbs) instead of seeds. A single cluster of 5 to 10 large cloves surrounds the hard stalk. Hardnecks are tolerant of cold weather and offer a range of flavors from mild to strong and spicy.
Softneck garlic (Alliums sativum ssp. sativum) rarely produces a flowering stalk; the cloves are smaller than hardnecks and are arranged in overlapping layers. A single head may have 6 to 18 cloves or more. The soft, pliable necks are easy to braid into garlic "ropes." Softneck varieties are less cold-tolerant and therefore better suited to growing in regions with mild winters, but they do keep longer in storage than hardneck garlic.
"There are hundreds of variety names for garlic, but there are only 10 major types based on their genetic diversity. Garlic varieties have been renamed many times as they passed among growers and gardeners, and as a result, many may be identical genetically." The 10 types or groups of garlic are rocambole, porcelain, purple stripe, marbled purple stripe, glazed purple stripe, Creole, Asiatic, and turban among the hardnecks; and silverskin and artichoke among the softnecks. The papery white garlic bulbs available in most grocery stores are artichoke-type softnecks.
Many garlic cultivars have names that indicate where they were traditionally grown or the color of their wrapper, including 'Oregon Blue', 'Chinese Pink', 'Chesnok Red', and 'Spanish Roja'.
'Asian Tempest'. Produces 6 or 7 cloves per bulb. Raw, this Asiatic-type garlic is quite hot, but it becomes sweeter and milder when cooked.
'Persian Star'. A purple stripe that produces 8 to 10 moderately spicy cloves and is suited for warmer climates.
'Creole Red'. A Creole-type garlic with 6 to 9 cloves that have a robust flavor.
'Music'. A porcelain variety with 4 to 6 large cloves per bulb and pretty pinkish white wrappers. Perfect for roasting.
'Spanish Roja'. A rocambole with 7 or 8 purple-streaked cloves per bulb and superior flavor when cooked.
'Xian'. This turban variety matures very early and produces 8 to 12 large, plump cloves.
Softneck
'Inchelium Red'. An artichoke variety with 9 to 18 cloves per bulb; this garlic has a mild lingering flavor that grows stronger in storage.
'California White'. Large bulbs with 10 to 20 mild-flavored cloves. This silverskin variety stores well and is perfect for braiding.
'Chilean Silver'. A pure white silverskin variety with 15 to 18 cloves per bulb.
This fact helps to explain why so many different variety names exist for genetically identical garlic. It's also an argument for buying locally grown garlic. If you buy garlic from a local farmers' market and plant the cloves, what you see at planting time is likely what you'll get when you harvest the bulbs.
Garlic produces the plumpest, tastiest bulbs when it grows in full sun and in deep, loamy, fertile soil. Garlic is susceptible to fungus when growing in a continually wet site. If you can, plant in a raised bed, which drains well and has loose soil.
Grow garlic in a spot that gets full sun and has loose, crumbly soil. Compacted soil produces irregularly shaped bulbs; soil that retains water, especially during the winter, will cause bulbs to rot. Improve the soil's fertility and texture by working in 1 to 2 inches of organic compost or aged manure before planting.
Longer spring days and warm weather help initiate bulb and top growth. Each green leaf represents one layer of the bulb's papery outer wrapper. The leaves will grow a foot or more, and it is critical to keep the soil evenly moist during this period of active growth, because dry soil will inhibit bulb enlargement. In early spring, spray the foliage with dilute liquid fish emulsion. There is no need to fertilize after May, because the extra nutrients will encourage leaf production at the expense of bulb size. When the leaves begin to yellow in summer, hold off on watering to prevent rot.
Harvesting Hints:
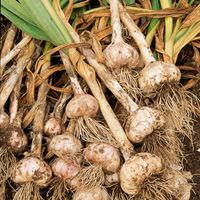
When half to three-quarters of the leaves turn yellow-brown, typically in late June or early July (depending on the variety and the weather), it's harvest time. Carefully dig up each bulb; do not pull, or you may break the stalk from the bulb, which can cause it to rot. Once it's harvested, get it out of the sun as soon as possible.
Harvested bulbs must dry thoroughly (a process called curing), or they will rot in storage. Carefully brush away soil, leaving the roots and leaves intact. Lay the garlic out in a single layer in a shaded, well-ventilated spot for 2 to 3 weeks. Once the outer wrapper layers of the bulb feel dry and papery, either braid the stems together or cut them off (leave a ½-inch stub) and store the bulbs in a mesh bag. In general, hardnecks last 6 to 10 months in storage, while softnecks can last up to a year, but homegrown garlic usually disappears into soups, salad dressings, and stir-fries well
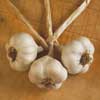
Tie the garlic together in bundles of 6 to 10 bulbs (label them if you've grown more than one variety) and hang them to cure for about four to six weeks in a shaded, dry, and preferably drafty area.
When your garlic is thoroughly dry, trim the roots, taking care not to knock off the outer skin. Cut off the stalks about 1½ inches above the bulb if you plan to keep the garlic in bags. Recycled mesh onion bags are perfect for storage.
1. Lay out three harvested and partially cured garlic plants as shown. Weave the leaves of each stalk together tightly a couple of times, near the bulbs.
2. Add a fourth head above the center one. Include its leaves with the others and weave a bit more.
3. Add two more heads, one to each side, as shown. Include these leaves with the others and keep braiding.
4. Add one, then two, and then one again until the braid reaches a desired length. Braid the remaining leaves together, tie with twine, trim the ends, and hang to dry.
1 large bulb garlic
pinch of salt
Directions
1. Preheat the oven to 400°F.
2. Cut a thin slice from the top of the garlic to expose the cloves. Place the head, cut side up, on a large piece of foil. Seal the top and sides of the foil tightly. Place in the oven and roast for 35 minutes, or until the cloves are very soft and lightly browned. Remove and set aside until cool enough to handle.
3. Squeeze the garlic cloves into a small bowl. With the back of a spoon, mash the garlic with the salt to make a smooth paste. Use in place of butter on potatoes, rice, or bread.